Intro To Fab | Week 2 | ❤️ Machine Box
Disclaimer: it's a very long blog post because I am horrible at carpentry.
The sentences marked with * are my opinions / observations and might not be true.
Getting Started - Inspiration & Planning
This week coincides with PComp's play-testing week, so I decided to create some kind of housing / enclosure for my PComp's final project.
The (tentative) name of the project is "❤️ Machine" and long story short, it is like a tamagotchi, but in a box form and houses a digital copy of Taylor Swift (or possibly someone else) instead of an animal pet. The machine will have a screen, speaker, Arduino micro-controller, FSR, piezzo (or microphone), few memory chips (EEProm), and battery power source.

Initial sketch
Part of the interaction with the machine is to carry it around like an actual tamagotchi, so I knew that I do not want a heavy and bulky box. After measuring my LCD screen, I decided to make a 3x3 inch cube.
I then planned how I would create the box.

As shown in the sketch, I planned to cut individual panels for the box, and carve/cut/drill each panel according to the sensor/actuator it'll hold. The lid would then have a hinge for it to open & close.
Raw Materials (Initial Stage)
At first I bought 02 thin (0.5cm) birch wood panels from Home Depot, and some wood glue, hinges, and super glue from Ace Hardware.

Step 1 - Measuring and Cutting Panels
I drew 3x3 inch rectangles on my wood panel and cut it using the band saw.


The cut panels were not exactly symmetrical, which I expected. But what I did not account for was when I tried to assemble the sides of the box, the thickness of the panels meant I needed slightly bigger panels for the bottom and top panels.
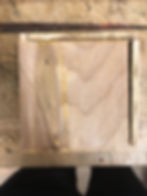
Notice the gap
So i drew more bigger rectangles and the wood panel, and lo & behold, someone broke the band saw in the wood shop :(
I had to use panel saw to cut my panels. One of the shop staff warned me that the blade of panel saw is thicker.
So I cut a lot of bottom/top panels because I knew that the dimensions would be off.

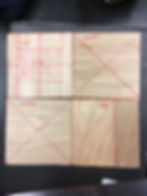
Step 2 - Cutting Shapes out of the Panels
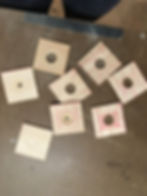
Now that I have my stack of panels, I drew the shapes I wanted to cut out of them.
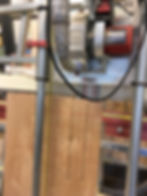
For the USB panel, I used the other band saw to cut a slit. It was hard to do it accurately because this band saw was also wonky (it could only go in a slow speed).

As for the piezzo and speaker panel, I measured the sensor / actuator and used hand drill to cut circles from their panels.
I planned to create a rectangular hole on LCD panel to fit my LCD screen, but I did not want to deal with cutting and reassembling wood at this point. I ended up drilling a bigger hole on these panels.
Also, I had to use hand drill (it got super hot!) because my panels were too thin* for the drill press. I was scared of damaging the base / platform of the drill press.
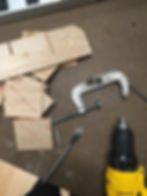
Step 3 - Assembly
This was where I started getting really frustrated.
My panels were too thin to be clamped*.
I could not use wood glue because of not being able to clamp. Even if I could, I did not have time to wait for 5x6 panels = 30 connections to set properly.
The next day, I went to Ace Hardware to find the smallest & thinnest nails they have, and bought it. My panels were still too thin for the smallest nails*.

This was really wonky

The panel couldn't hold together
So I had to resort to other types of glues. My first attempt was with hot glue, but with some kind of extra support from extra bits of wood.

More contact point for the glue.
I cut up some junk wood and attempted to assemble the box.


Did not work at all. The glue hardened too fast and created gaps. The extra bits didn't help at all. And I could pull the box apart easily.
I resorted to my last option: super glue...And it worked (?). I could apply pressure with my hands, flushed the edges, and the glue hardened quick enough.


Obviously the panels' lengths were off and I had protruding edges, but the box felt solid in my hands and it was nearing 12.00am. I went home after assembling 5 boxes without lids.
Step 4 - Sanding
Pretty straightforward. Managed to eliminate protrusion / unevennes through a lot of sanding. Used both sand machine (edges, panel sides) and sandpaper (holes & crevices).
I especially enjoyed making the edges rounded because the boxes suddenly became a lot friendlier now.


Step 5 - Connecting the Lid
I bought some hinges, but I didn't know that hinges were meant to be installed from the inside* and small box does not necessarily mean small hinge.
My screws were clearly protruding out of the box
I tried to put little friendly nubs to hide the screw
But failed again because I kept having this gap created by the joint.


I bought bigger hinges and installed them from the outside. This worked, but when you open the box you could see the screws intersecting with each other inside.

Final Product

No glory shots because I still plan to put faux fur all over the boxes.
Learnings & What I Would Do Differently
I decided to use thin wood so that the box would be light, have a lot of room inside, and not bulky. But maybe this was not the correct approach? I had a lot of issues (couldn't drill, dowel, clamp) because of how thin the wood was. Or maybe I could've used wood glue to stick two pieces of thing wood together?
Making a box with multiple panels might not be the best idea without precision cutting tools. A classmate told me (after I was done) that I could do this much more easily with a laser cutter.
I should have installed the hinges before assembling the boxes.
I should not have bought a lot of components (e.g. hinges, nails) without testing it out first. I could have tried making 01 prototype first before moving along.
I actually bought wood filler but did not have time to use it to close the small gaps.